Planning Your Smart Home Transformation
Transforming your traditional home into a smart home starts with careful planning. A well-thought-out plan ensures you invest wisely, avoid common pitfalls, and create a seamless connected environment that truly fits your lifestyle. Here’s how to get started:
1. Assess Your Needs and Priorities
The first and most important step is to evaluate what you want from a smart home. Are you primarily focused on:
-
Security: Monitoring your home remotely with cameras, sensors, and smart locks?
-
Energy Efficiency: Automating heating, cooling, and lighting to save on bills?
-
Convenience: Hands-free control of lighting, entertainment, and appliances?
-
Comfort and Lifestyle: Creating ambiance with smart lighting, managing climate control, or enhancing entertainment systems?
List your goals. For example, you might want smart locks and cameras for security plus smart thermostats for energy savings.
2. Set a Realistic Budget
Smart home technology can be as simple or as sophisticated as you want, but costs vary greatly:
-
Entry-level devices: Smart plugs or bulbs may cost $15-$50 each.
-
Mid-range: Smart thermostats, security cameras, or smart hubs usually cost $100-$300.
-
High-end: Comprehensive home automation systems and professional installations can run into thousands.
Decide how much you’re willing to spend upfront and consider phasing your upgrades over time. Prioritize must-have devices first, and expand later.
3. Research Device Compatibility
To avoid frustration and extra costs, ensure that devices you choose are compatible with each other and your preferred smart home ecosystem, such as:
-
Amazon Alexa
-
Google Assistant
-
Apple HomeKit
Also, check communication protocols: Zigbee, Z-Wave, and Wi-Fi are the most common. Picking devices that “play well” together prevents a fragmented system.
4. Map Out Your Home’s Layout
Visualize where devices will be installed:
-
Entry points for cameras and smart locks
-
Living areas for lighting and speakers
-
HVAC vents and thermostats
-
Areas needing sensors (motion, smoke, water leak)
A floor plan sketch helps decide placement for optimal coverage and network strength.
Top 10 Smart Home Devices You Need to Automate Everything
5. Ensure Reliable Wi-Fi Coverage
Wi-Fi is the backbone of your smart home. Common problems arise from weak signals or dead zones. To prevent this:
-
Test Wi-Fi strength in every room.
-
Consider investing in a mesh Wi-Fi system for whole-home coverage.
-
Use Wi-Fi extenders or powerline adapters for tough spots.
Strong, consistent internet connectivity ensures your smart devices respond quickly and reliably.
Summary Table: Planning Your Smart Home – Key Steps and Considerations
| Step | Key Actions | Considerations |
|---|---|---|
| Assess Needs | List desired features and goals | Focus on security, energy, comfort |
| Set Budget | Allocate funds, phase upgrades | Balance cost vs. benefits |
| Check Compatibility | Research ecosystems & protocols | Amazon Alexa, Google Assistant, Apple |
| Map Device Locations | Plan placement on floor plan | Maximize coverage & connectivity |
| Ensure Wi-Fi Strength | Test and improve home network | Mesh systems recommended |
Essential Smart Devices to Start With
Once you have planned your smart home upgrade, the next step is choosing the right devices to build your smart ecosystem. Starting with essential smart devices ensures that your home gains immediate benefits in convenience, security, and energy efficiency. Here are the core devices you should consider as your foundation:
1. Smart Hub or Controller: The Heart of Your Smart Home
A smart hub is a centralized device that connects and controls all your smart devices through one interface. It supports multiple communication protocols like Zigbee, Z-Wave, and Wi-Fi, enabling different brands to work together seamlessly.
Popular Smart Hubs:
-
Samsung SmartThings Hub
-
Amazon Echo (with Zigbee built-in)
-
Hubitat Elevation
Why You Need It:
Without a hub, managing multiple devices from different manufacturers can be complex. A hub simplifies control, automation, and monitoring.
2. Smart Lighting: Illuminate Your Life with Automation
Smart lighting lets you control brightness, color, and schedules from your phone or voice assistant.
Options:
-
Smart bulbs (Philips Hue, LIFX) that screw into existing fixtures
-
Smart switches (Lutron Caséta, TP-Link Kasa) replacing wall switches
Benefits:
-
Energy savings through scheduling and dimming
-
Personalized ambiance with color-changing bulbs
-
Voice and remote control convenience
3. Smart Thermostats: Efficient Climate Control
Smart thermostats learn your preferences, adjust temperatures automatically, and can be controlled remotely.
Top Choices:
-
Google Nest Learning Thermostat
-
Ecobee SmartThermostat
-
Honeywell Home T9
Benefits:
-
Lower energy bills by optimizing heating and cooling
-
Control from anywhere with smartphone apps
-
Integration with other smart devices and voice assistants
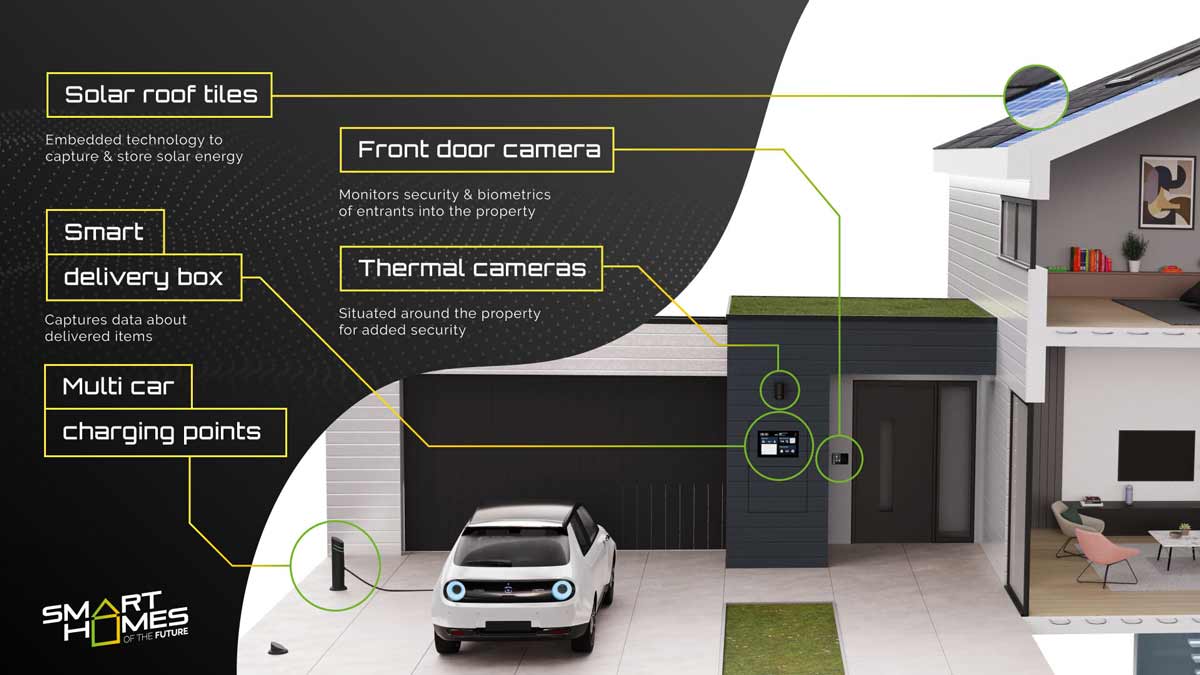
4. Smart Security Cameras and Doorbells: Watch Over Your Home
Monitor your property remotely with high-definition cameras and video doorbells.
Popular Devices:
-
Ring Video Doorbell
-
Arlo Pro Cameras
-
Google Nest Cam
Features:
-
Real-time alerts and video streaming
-
Motion detection and night vision
-
Two-way audio to speak with visitors remotely
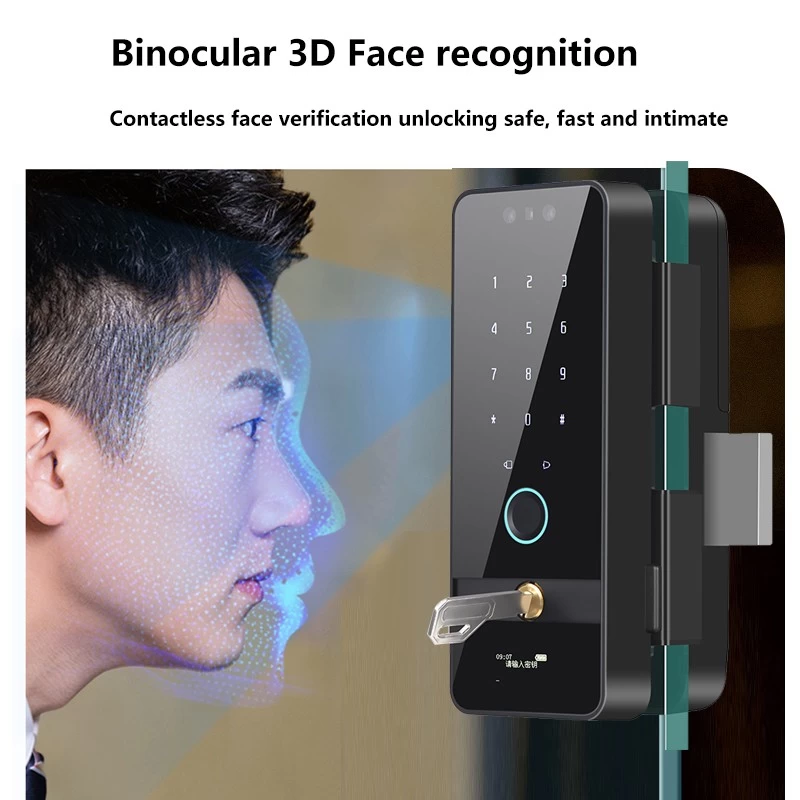
5. Smart Locks: Keyless Access and Enhanced Security
Replace traditional locks with smart locks to control access digitally.
Leading Models:
-
August Smart Lock Pro
-
Schlage Encode
-
Yale Assure Lock
Advantages:
-
Lock/unlock remotely
-
Temporary access codes for guests
-
Integration with security systems and voice control
Ultimate Guide to Starting and Growing a Smart Home!
Summary Table: Essential Smart Devices for Your Smart Home
| Device Type | Key Features | Benefits | Popular Brands |
|---|---|---|---|
| Smart Hub | Multi-protocol control center | Unified device management | Samsung SmartThings, Hubitat |
| Smart Lighting | Remote control, scheduling | Energy savings, mood setting | Philips Hue, LIFX, Lutron Caséta |
| Smart Thermostat | Learning temperature control | Energy efficiency, remote access | Nest, Ecobee, Honeywell |
| Smart Security Cameras | HD video, motion detection | Remote monitoring, security alerts | Ring, Arlo, Google Nest |
| Smart Locks | Keyless entry, remote locking | Enhanced security, convenience | August, Schlage, Yale |
Bonus Tip: Choose Devices That Integrate Seamlessly
Look for devices that work with your chosen smart hub and voice assistant to build a cohesive and easy-to-use smart home. Avoid mixing too many brands unless your hub supports them well.
Installation and Configuration — Getting Your Smart Devices Online
Now that you’ve selected the essential devices to start your smart home transformation, it’s time to dive into the installation and setup process. This part of your journey requires attention to detail, but fear not — I’ll walk you through it step by step.
🛠️ 1. Set Up Your Smart Hub or Controller
Purpose: Acts as the brain of your smart home.
Time Required: ~20 minutes
Steps:
-
Choose a Central Location
-
Place your hub near your Wi-Fi router for optimal connectivity.
-
Avoid locations with metal obstructions or appliances.
-
-
Connect the Hub
-
Plug it in and connect to your router (via Ethernet or Wi-Fi).
-
Follow the instructions in the app (e.g., SmartThings, Hubitat).
-
-
Create an Account
-
Register and log in using the official app.
-
Update firmware if prompted.
-
-
Add Devices
-
Use the “Add Device” function to start pairing bulbs, sensors, locks, etc.
-
Label each device for easy identification (e.g., “Living Room Light”).
-
💡 2. Install and Set Up Smart Lights
Purpose: Energy efficiency, ambiance, automation
Time Required: ~10–15 minutes per room
Smart Bulbs:
-
Replace Traditional Bulbs
-
Turn off the light switch and screw in the smart bulb.
-
-
Power On and Sync
-
Turn the switch back on.
-
Open the smart lighting app (e.g., Philips Hue, LIFX) and follow pairing steps.
-
-
Name and Group
-
Label bulbs by room (“Bedroom Ceiling”) and create groups (“All Living Room Lights”).
-
Smart Switches (Advanced):
-
Turn Off Circuit Breaker
-
Ensure safety before handling wires.
-
-
Remove Old Switch
-
Take note of existing wiring and match it to the smart switch.
-
-
Install New Switch
-
Connect wires according to manual.
-
Turn power back on.
-
-
Test and Configure
-
Use the app to name and automate your new smart switch.
-
🌡️ 3. Install Your Smart Thermostat
Purpose: Save energy and maintain comfort
Time Required: ~30–45 minutes
Steps:
-
Turn Off Power
-
Switch off the HVAC breaker to prevent shorts.
-
-
Label and Disconnect Wires
-
Use provided stickers to label wires.
-
Remove the old thermostat.
-
-
Install Backplate and Connect Wires
-
Mount the new unit.
-
Connect wires to matching terminals (W, Y, G, C, etc.).
-
-
Power On and Configure
-
Follow on-screen prompts or app setup.
-
Input location, preferred temp ranges, and Wi-Fi.
-
-
Integrate With Voice Assistant or Hub
-
Connect via Alexa, Google, or Apple HomeKit.
-
🛡️ 4. Install Smart Cameras & Doorbells
Purpose: Surveillance and remote awareness
Time Required: ~20–60 minutes
Indoor/Outdoor Cameras:
-
Pick a Mounting Spot
-
Cover high-traffic areas and entry points.
-
Avoid direct sun glare and rain exposure.
-
-
Mount and Connect
-
Use wall mounts or place on flat surfaces.
-
Power via cable or battery.
-
-
Sync to App
-
Use the companion app (e.g., Ring, Nest) to connect to Wi-Fi.
-
-
Set Motion Zones and Alerts
-
Customize areas to monitor and adjust sensitivity.
-
Smart Doorbells:
-
Turn Off Power
-
Disconnect the existing doorbell wiring safely.
-
-
Install New Unit
-
Screw into the doorframe.
-
Connect wires or use battery option.
-
-
Configure and Pair
-
Use the app to pair and set notification preferences.
-
🔐 5. Set Up Smart Locks
Purpose: Keyless entry and security control
Time Required: ~15–30 minutes
Steps:
-
Remove Existing Lock
-
Unscrew and remove interior and exterior parts.
-
-
Install Smart Lock
-
Follow manual to fit the smart lock onto the door.
-
Ensure deadbolt alignment.
-
-
Pair with App
-
Use Bluetooth or Wi-Fi to sync with the app.
-
-
Add Users and Access Codes
-
Create custom access for family or guests.
-
Enable auto-lock and geofencing if available.
-

Smart-Home-Threats-and-Countermeasures
✅ Device Setup Overview Table
| Device Type | Setup Time | Setup Difficulty | Required Tools | App Required |
|---|---|---|---|---|
| Smart Hub | 20 min | Easy | None | SmartThings, Hubitat |
| Smart Bulbs | 10 min | Very Easy | None | Hue, LIFX |
| Smart Thermostat | 45 min | Moderate | Screwdriver, Labels | Nest, Ecobee |
| Smart Cameras | 30 min | Moderate | Drill (for mounting) | Ring, Arlo, Nest |
| Smart Locks | 25 min | Moderate | Screwdriver | August, Schlage |
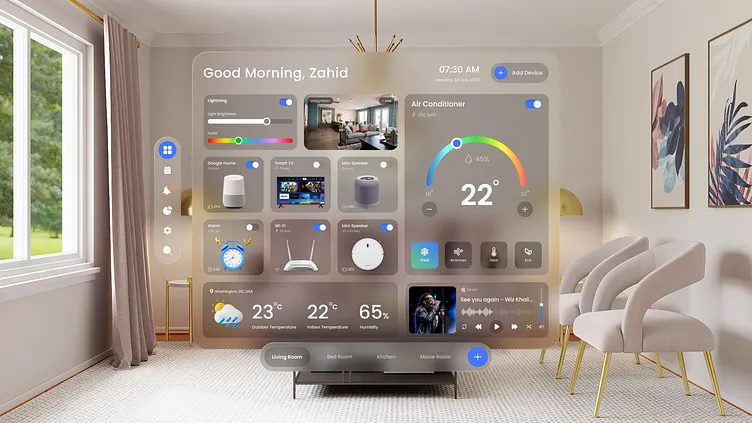
Creating Smart Routines, Automations & Voice Control Magic
Now that your devices are installed and connected, it’s time to unleash the full potential of your smart home. In this phase, we will create seamless automations, schedule routines, and integrate powerful voice controls using assistants like Alexa, Google Assistant, and Siri.
🔁 1. Automations: Making Devices Work Together
Definition: Automations are rule-based triggers that tell one or more devices to take action based on time, location, or sensor input.
Common Automation Triggers:
-
Time-based: E.g., lights turn on at sunset
-
Sensor-based: E.g., lights turn on when motion is detected
-
Geo-fencing: E.g., thermostat turns off when you leave home
-
Device status: E.g., if the front door unlocks, start hallway lights
Sample Automations:
🛏 Morning Routine:
-
6:30 AM: Bedroom lights gradually turn on
-
Thermostat raises temperature
-
Smart speaker plays morning news
-
Coffee machine starts brewing
🌇 Evening Routine:
-
7:30 PM: Living room lights dim
-
Curtains close automatically
-
Security cameras activate motion alerts
How to Set Up in App:
-
Open your smart home hub app (e.g., SmartThings, Home Assistant).
-
Go to “Automations” or “Scenes”.
-
Tap “+” to create a new routine.
-
Set Trigger > Add Conditions > Choose Actions.
-
Save, name it, and test.
🎤 2. Voice Assistants: Speak Your Home’s Language
Compatible Assistants:
-
Amazon Alexa
-
Google Assistant
-
Apple Siri (via HomeKit)
Benefits of Voice Control:
-
Hands-free convenience
-
Natural control while multitasking
-
Accessibility for elderly or differently-abled
Example Commands:
💡 Lighting:
-
“Alexa, turn off the kitchen lights.”
-
“Hey Google, set living room lights to 20% brightness.”
🌡 Thermostat:
-
“Hey Siri, set the thermostat to 72 degrees.”
🔒 Security:
-
“Alexa, is the front door locked?”
-
“Hey Google, show me the front porch camera.”
🎵 Entertainment:
-
“Play jazz in the living room.”
-
“Pause the TV in the kids’ room.”
Setup Tips:
-
Open the assistant app.
-
Go to Devices > Add Devices.
-
Link your smart home platform account (e.g., SmartThings).
-
Assign devices to rooms and create voice groups (e.g., “All Lights”).
-
Test with a few voice commands.
🧠 3. Advanced Scenarios with IFTTT & Home Assistant
🔗 IFTTT (If This Then That):
Allows your devices and services to work together — even if they’re from different ecosystems.
Example Applets:
-
If the doorbell rings, then blink porch lights.
-
If the air quality drops, turn on the air purifier.
🧬 Home Assistant:
For those who want deep customization, Home Assistant offers local control, no-cloud dependency, and thousands of integrations.
Features:
-
Build dashboards
-
Add complex conditions
-
Integrate obscure devices and APIs
-
Automate with YAML scripts or Node-RED
🔂 4. Creating Scenes for Moments
Scenes group device actions under a single command or tap. They’re perfect for setting a mood or simplifying everyday routines.
Popular Scenes:
| Scene Name | Devices Involved | Action |
|---|---|---|
| Movie Night | Lights, TV, Blinds, Sound System | Dim lights, turn on TV, close blinds, start Netflix |
| Away Mode | Locks, Cameras, Lights | Lock doors, arm cameras, turn off lights |
| Welcome Home | Lights, Thermostat, Door Lock, Music | Unlock door, turn on lights, set temp, play soft music |
| Goodnight | Lights, Thermostat, Locks, Security | Turn off lights, lower temp, lock doors, activate cameras |
How to Set:
-
Go to Scenes or Routines in your app.
-
Tap “+” > Add desired devices and their actions.
-
Assign a voice command shortcut (e.g., “Alexa, movie time”).
-
Save and automate or schedule it.
Whether you’re starting or growing a smart home in 2025, this video is packed with tips for beginner to advanced level!
📊 Table: Smart Home Control Methods Comparison
| Control Type | Best For | Hands-Free | Multi-Device Control | Skill Level Required |
|---|---|---|---|---|
| Manual App | Precision, specific tasks | ❌ | ✅ | Beginner |
| Voice Control | Convenience, multitasking | ✅ | ✅ | Beginner |
| Automation Rules | Time/trigger-based routines | ✅ | ✅ | Intermediate |
| Scenes | Mood-based grouping | ✅ | ✅ | Beginner |
| IFTTT/HomeAssistant | Custom cross-platform automation | ✅ | ✅ | Advanced |
🔐 Security Tip
Always enable two-factor authentication for your voice assistants and smart home platforms. Limit device sharing and review voice history periodically for privacy.
Creating Smart Routines, Automations & Voice Control Magic
Now that your devices are installed and connected, it’s time to unleash the full potential of your smart home. In this phase, we will create seamless automations, schedule routines, and integrate powerful voice controls using assistants like Alexa, Google Assistant, and Siri.
1. Automations: Making Devices Work Together
Definition: Automations are rule-based triggers that tell one or more devices to take action based on time, location, or sensor input.
Common Automation Triggers:
- Time-based: E.g., lights turn on at sunset
- Sensor-based: E.g., lights turn on when motion is detected
- Geo-fencing: E.g., thermostat turns off when you leave home
- Device status: E.g., if the front door unlocks, start hallway lights
Sample Automations:
Morning Routine:
- 6:30 AM: Bedroom lights gradually turn on
- Thermostat raises temperature
- Smart speaker plays morning news
- Coffee machine starts brewing
Evening Routine:
- 7:30 PM: Living room lights dim
- Curtains close automatically
- Security cameras activate motion alerts
How to Set Up in App:
- Open your smart home hub app (e.g., SmartThings, Home Assistant).
- Go to “Automations” or “Scenes”.
- Tap “+” to create a new routine.
- Set Trigger > Add Conditions > Choose Actions.
- Save, name it, and test.
2. Voice Assistants: Speak Your Home’s Language
Compatible Assistants:
- Amazon Alexa
- Google Assistant
- Apple Siri (via HomeKit)
Benefits of Voice Control:
- Hands-free convenience
- Natural control while multitasking
- Accessibility for elderly or differently-abled
Example Commands:
Lighting:
- “Alexa, turn off the kitchen lights.”
- “Hey Google, set living room lights to 20% brightness.”
Thermostat:
- “Hey Siri, set the thermostat to 72 degrees.”
Security:
- “Alexa, is the front door locked?”
- “Hey Google, show me the front porch camera.”
Entertainment:
- “Play jazz in the living room.”
- “Pause the TV in the kids’ room.”
Setup Tips:
- Open the assistant app.
- Go to Devices > Add Devices.
- Link your smart home platform account (e.g., SmartThings).
- Assign devices to rooms and create voice groups (e.g., “All Lights”).
- Test with a few voice commands.
3. Advanced Scenarios with IFTTT & Home Assistant
IFTTT (If This Then That):
Allows your devices and services to work together — even if they’re from different ecosystems.
Example Applets:
- If the doorbell rings, then blink porch lights.
- If the air quality drops, turn on the air purifier.
Home Assistant:
For those who want deep customization, Home Assistant offers local control, no-cloud dependency, and thousands of integrations.
Features:
- Build dashboards
- Add complex conditions
- Integrate obscure devices and APIs
- Automate with YAML scripts or Node-RED
4. Creating Scenes for Moments
Scenes group device actions under a single command or tap. They’re perfect for setting a mood or simplifying everyday routines.
Popular Scenes:
| Scene Name | Devices Involved | Action |
|---|---|---|
| Movie Night | Lights, TV, Blinds, Sound System | Dim lights, turn on TV, close blinds, start Netflix |
| Away Mode | Locks, Cameras, Lights | Lock doors, arm cameras, turn off lights |
| Welcome Home | Lights, Thermostat, Door Lock, Music | Unlock door, turn on lights, set temp, play soft music |
| Goodnight | Lights, Thermostat, Locks, Security | Turn off lights, lower temp, lock doors, activate cameras |
How to Set:
- Go to Scenes or Routines in your app.
- Tap “+” > Add desired devices and their actions.
- Assign a voice command shortcut (e.g., “Alexa, movie time”).
- Save and automate or schedule it.
Table: Smart Home Control Methods Comparison
| Control Type | Best For | Hands-Free | Multi-Device Control | Skill Level Required |
| Manual App | Precision, specific tasks | ❌ | ✅ | Beginner |
| Voice Control | Convenience, multitasking | ✅ | ✅ | Beginner |
| Automation Rules | Time/trigger-based routines | ✅ | ✅ | Intermediate |
| Scenes | Mood-based grouping | ✅ | ✅ | Beginner |
| IFTTT/HomeAssistant | Custom cross-platform automation | ✅ | ✅ | Advanced |
Security Tip
Always enable two-factor authentication for your voice assistants and smart home platforms. Limit device sharing and review voice history periodically for privacy.
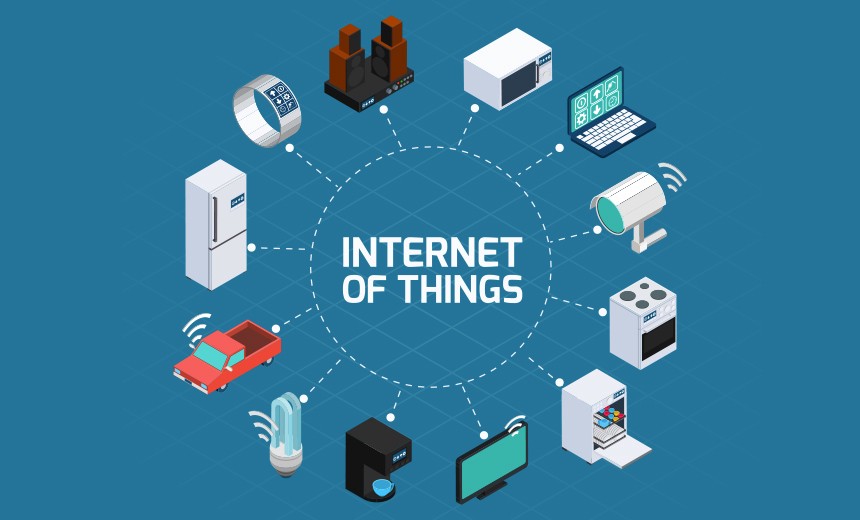
What_is_IoT
Frequently Asked Questions (FAQ)
1. What is the first smart device I should install in my home?
Start with a smart thermostat or smart lighting system — they’re easy to set up, save money, and offer immediate convenience.
2. How much does it cost to fully automate a home?
Basic automation may cost around $1,000–$3,000. A fully integrated smart home setup can range from $5,000 to $25,000+, depending on home size and complexity.
3. Can I install smart devices without hiring a professional?
Yes! Many devices like smart bulbs, plugs, and voice assistants are plug-and-play. For security systems or hardwired thermostats, professional help may be useful.
4. What’s the best voice assistant for a smart home?
It depends on your ecosystem:
-
Amazon Alexa is most compatible across devices.
-
Google Assistant is great for search-based tasks.
-
Apple HomeKit offers tight privacy controls and works best with iOS.
5. Is smart home tech safe from hackers?
Smart homes can be secure if you:
-
Use strong passwords.
-
Enable two-factor authentication.
-
Regularly update device firmware.
-
Avoid cheap, unverified products.
6. Can I control everything from one app?
Many platforms like SmartThings, Home Assistant, or Apple Home offer centralized control — but not all devices are universally compatible.
7. What if my Wi-Fi goes down?
Some smart devices (like Zigbee/Z-Wave systems) still work locally, but cloud-dependent devices may become unresponsive without internet.
8. Do smart homes save money in the long run?
Yes. Smart thermostats, energy monitors, and automated lighting can significantly reduce utility bills — often paying for themselves in under two years.
9. Are smart homes environmentally friendly?
Yes. Smart energy usage, water leak detection, and climate control help reduce your carbon footprint.
10. How do I future-proof my smart home setup?
Choose devices that support common protocols (like Matter, Zigbee), stick to reputable brands, and opt for open ecosystems for better integration over time.
Summary & Final Insights
Transforming a traditional home into a smart home is no longer a futuristic fantasy — it’s practical, powerful, and highly rewarding. We’ve walked through each stage of the process:
-
Evaluating your needs and connectivity.
-
Installing foundational devices (hubs, thermostats, lighting).
-
Expanding with security, voice control, and energy optimization.
-
Using automation routines for convenience and savings.
The key is not to do it all at once. Start simple. Build gradually. Prioritize functionality over novelty.
Ultimate Guide to Starting and Growing a Smart Home!
Results You Can Expect
| Category | Traditional Home | Smart Home |
|---|---|---|
| Energy Efficiency | Manual controls | Optimized with sensors and AI |
| Monthly Utility Cost | Higher due to inefficiency | Reduced by 10%–30% average |
| Security | Key-based, basic alarms | Remote access, AI alerts, automation |
| Comfort & Control | Manual | Automated, voice- and app-controlled |
| Home Value | Standard | Increased resale appeal |
Final Thoughts & What to Do Next
Smart home living isn’t about luxury — it’s about control, safety, comfort, and savings. Whether you’re upgrading a studio apartment or a 4-bedroom house, the smart revolution is scalable, accessible, and surprisingly intuitive.
✅ Next Steps:
-
Choose your platform: Amazon Alexa, Google Home, or Apple HomeKit.
-
Buy your starter devices: Begin with a smart plug, bulb, or thermostat.
-
Download the companion apps and begin customizing.
-
Set automation routines based on your schedule and lifestyle.
-
Gradually add devices — from security cameras to voice assistants.
And remember: your home should work for you — not the other way around.